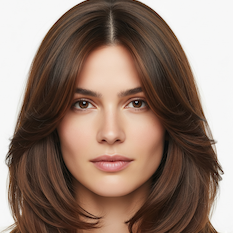
Face-Framing Layers: See It on Your Photo
Soft layers cut around the front of the face to highlight the eyes and cheekbones. Can be adapted to flatter almost any face shape and length.
Included in Free, Creative Spark and Elite Pro
Face shapes it suits
- Oval
- Round
- Square
- Heart
- Diamond
This is the smallest change that still gets noticed. Only the front sections are shortened, usually starting between the cheekbones and the collarbone, while the rest of the hair keeps its length. The layers curve around the face and draw attention to the eyes, cheekbones and jawline.
Where the layers begin is worth discussing with your stylist. Starting at the cheekbones highlights the eyes; starting at the chin softens the jaw. Pieces falling below the chin lengthen round faces, softer pieces at the jaw ease square angles, and length around the chin balances heart and diamond shapes. On oval proportions, the choice comes down to which feature you want to highlight.
They suit straight, wavy and curly hair. Blow-dry the front sections back and away from the face with a round brush, or twist them around a curling wand for a gentle bend. Because only a few pieces need shaping, front trims every six to eight weeks are quick appointments.
Frequently Asked Questions
- Where should face-framing layers start?
- It depends on your features. Layers starting at the cheekbones highlight the eyes, while ones starting at the chin soften the jaw. Your stylist can suggest a starting point.
- Can I add face-framing layers without changing my length?
- Yes. Only the front sections are shortened, so the rest of your hair keeps its length, which makes this a low-commitment update.
- How do I style face-framing layers?
- Blow-dry the front pieces with a round brush, directing them away from your face. A flat iron with a slight outward bend works well on second-day hair.